Return the look of the great grandmother’s classic kitchen cupboard – which looks so fresh and bright next to the ice box. The fresh and clean lines emphasize a clean and efficient kitchen with a place for everything – maybe including a kitchen full of season canning, along with a complete entrance to the cellar.
You can add your own special touch to a sturdy white cupboard that can hold plates, pans, and pans and can items like they do for grandma. Include a pot window, edible ingredients, or a copper hanging basket to store onions and fruit.
Add a banana saver to the counter – the right place to hang the supermarket’s green banana. Even if your kitchen is one of the 1960’s olive refrigerators, you can make it work with a white cupboard. Fridge magnets can reflect these practical and attractive clean lines of cabinets, as do prescription displays, notes for families and even handwork by young people in your household or extended family.
If your closet is genuine antiques, you can update it with real milk paint – paint that is often used on home furniture. Dress up worn cabinets with new fasteners but make sure to keep a theme that reflects the feel of the kitchen.
Glass knobs are often used, and turnbuckles are not more modern clip fasteners or magnetic doors. Don’t forget to add some comfortable kitchen chairs around the table that are sturdy, painted to fit the cabinet.
The real secret of Grandma’s kitchen is an excellent space for doing homework, talking to family, and providing work surfaces for making homemade cakes, cakes and bread. But you don’t need to do all that to recreate the atmosphere that used to be centered around the busiest room in the house.
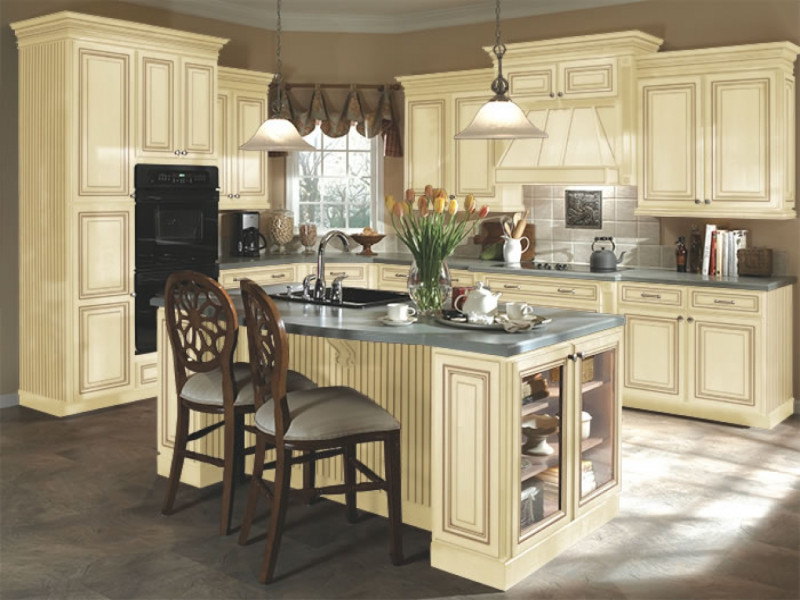
Creamy or antique white is a good neutral choice that will look good in a closet in most kitchen spaces. Antique white kitchen cabinets can create a beautiful atmosphere in your kitchen and are a great way to calm a normally busy space. If the cupboard feels very old and worn, use an imitation coating to perfect this look in a cool way.
Choosing the right white for your kitchen cabinet can be an amazing process because there are so many different colors to choose from.
White that feels cold or cold will work well in a more modern space with bold colors while antique nuances will glow in a vintage style or rustic kitchen.
To choose the right white color, see other colors and furniture in your room and choose white that matches the other elements. If you want to keep things neutral, use antique white in all your cabinets.
If you want to inject a little color, consider using gray, cream, blue, yellow, or green in your bottom cabinet. Here few steps to make antique your white kitchen cabinets.
Prepare Your Cabinets
Remove the cabinet door, as well as the hinges, knobs and other equipment. The process of antiquing cabinets is much easier, and you will get slimmer results if you disassemble the cabinet before trying antiquing treatments.
Remember to arrange screws, hinges, and other attachments in a safe place so that they don’t disappear. Use sandpaper to harden all cabinet surfaces that you plan to antiquing. Be sure to delete the final result.
Shiny cabinets will require extra sanding. Clean the cabinet with a wet cloth so that the paint will stick to it, and make sure they are free of sandpaper dust.
Choose Process for Antiquing White Cabinets
Glazing and distressing are two techniques that can also be used to give your closet an antique look. To glaze your closet, you will make or choose a glaze mixture and brush it into your closet using a paint brush or foam brush. You have to repeat this process until you get the desired look; this can take a long time.
Glaze Your Cabinets
Glazing makes the white and light-colored cabinet look older and slightly gloomy. Glaze is only 1 cabinet at a time.
You can choose to mix brown, yellow or yellow water-based paint with water or a mixture of store-bought glaze, 3 parts of paint for 1 part water / glaze media, or you can use coloring.
Adjust the glaze of the glaze by adding more water or glaze medium, according to your personal preferences. Paint brush or foam brush could be an option.
Clean excess glaze using a cloth or paper towel. Repeat the glaze until you get the desired effect. The antiquing white cabinet with the glaze method is a process, and you may need to build layer by layer before you are satisfied with the antiquing level.
For greater detail and dimensions, use a small paint brush to coat extra glaze into cracks, crevices and joint lines, where dust will settle naturally.
Before being glazed, use 220-grit sandpaper to sand the parts that are normally used in the cupboard. Clean dust with nail cloth. This will help color stick in the area.
Replace hardware that looks modern and shiny like chrome, brass and nickel, with antique brass brushes or antique copper brush hardware to give a more natural look to the antiqued cabinets.
Distress Your Cabinets
The purpose of distress is to achieve the effects of years of wear and tear. When making antique cabinets, you can press as much or as little as you want.
Rub the key above the cabinet surface to make a random line, or indentation, similar to what the old cabinet had. Experiment with several different sized buttons for different effects.
Use an ice breaker or fork to punch holes in the cabinet. These holes must look like natural wormholes for old cabinets.
Dab the cabinet with a chain to make a series of random and irregular dents on the wood. Sand the edges with sandpaper to give an outdated appearance.
Apply Crackle Finish
Crunching can make your closet look like old paint and sunbathe. Paint your cabinet with store-bought cracking media and let it dry. While the media dries, it tends to shrink or crack and will make your closet look old and old.
They are several tips to make an Antique white kitchen cabinets. Enjoy it!
Keyword: Antique White Kitchen Cabinets